
BlackOps Market Access Guide 2026 - Complete Step-by-Step Tutorial
Tor Setup | PGP Configuration | Registration | Secure Trading | Updated January 20, 2026
Tor Setup | PGP Configuration | Registration | Secure Trading | Updated January 20, 2026
This BlackOps Market guide covers everything you need to access the platform safely. From initial software setup through your first BlackOps Market transaction, each step is explained in detail. Following this BlackOps Market tutorial ensures you start on the right foot.
Using darknet platforms carries inherent risks. This guide focuses on security practices but cannot eliminate all dangers. Use at your own discretion and never store more funds than necessary on any platform.
Estimated time to complete setup: 30-45 minutes for first-time users.
Before accessing BlackOps Market, you need several software tools. The BlackOps Market platform requires specific security measures that regular browsers cannot provide. All software for BlackOps Market access is free and available for Windows, macOS, and Linux.
Required. The only browser capable of accessing .onion addresses. Download exclusively from torproject.org.
Verify the download signature before installation to ensure authenticity.
Required. PGP encryption software for mandatory 2FA. Download from gnupg.org.
Windows users can use Gpg4win. macOS users can use GPG Suite or command line.
Required. Any TOTP app works: Aegis, andOTP, FreeOTP. Avoid cloud-synced authenticators for better security.
Used for time-based one-time passwords during login.
Recommended. KeePassXC stores credentials offline. Generate unique strong passwords for each account.
Never reuse passwords across platforms.
| Tool | Purpose | Difficulty |
|---|---|---|
| Tails OS | Amnesic operating system, leaves no trace | Moderate |
| Whonix | Virtual machine isolating Tor traffic | Advanced |
| Air-gapped Computer | Offline PGP key generation and storage | Advanced |
Tor Browser routes your traffic through encrypted relays, hiding your IP address and location. It's the only browser that can access BlackOps Market and other .onion addresses. Proper Tor Browser configuration is essential for BlackOps Market security.
Default Tor Browser settings balance usability and security. For darknet access, increase protection:
Click the shield icon in toolbar → select "Safest". This disables JavaScript and many potentially dangerous features automatically.
Type about:config in address bar → accept warning → search for javascript.enabled → double-click to set false.
PGP (Pretty Good Privacy) enables encrypted communication and mandatory 2FA on BlackOps Market. Every BlackOps Market account requires PGP verification. You'll generate a key pair: public key (shared with BlackOps Market) and private key (kept secret).
brew install gnupg) or download GPG Suitesudo apt install gnupg (Debian/Ubuntu)Open terminal (Command Prompt on Windows) and run:
gpg --full-generate-keyFollow the prompts:
After generation, export the public key to share during registration:
gpg --armor --export your-email@example.comThis outputs your public key in text format. Copy everything from -----BEGIN PGP PUBLIC KEY BLOCK----- to -----END PGP PUBLIC KEY BLOCK-----.
To verify your setup works:
# Create test message
echo "Test message" > test.txt

# Encrypt to yourself
gpg --armor --encrypt --recipient your-email@example.com test.txt

# Decrypt
gpg --decrypt test.txt.ascFor maximum security, generate keys on a computer that has never been connected to the internet:
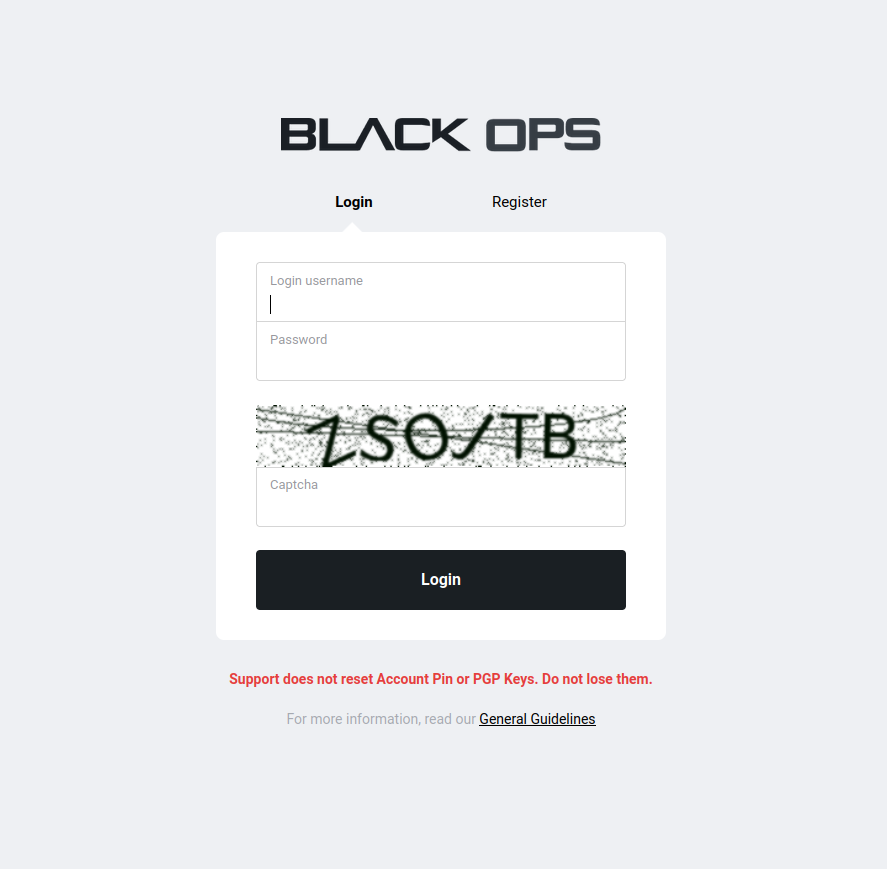
With Tor Browser configured and PGP key ready, you can now create your account.
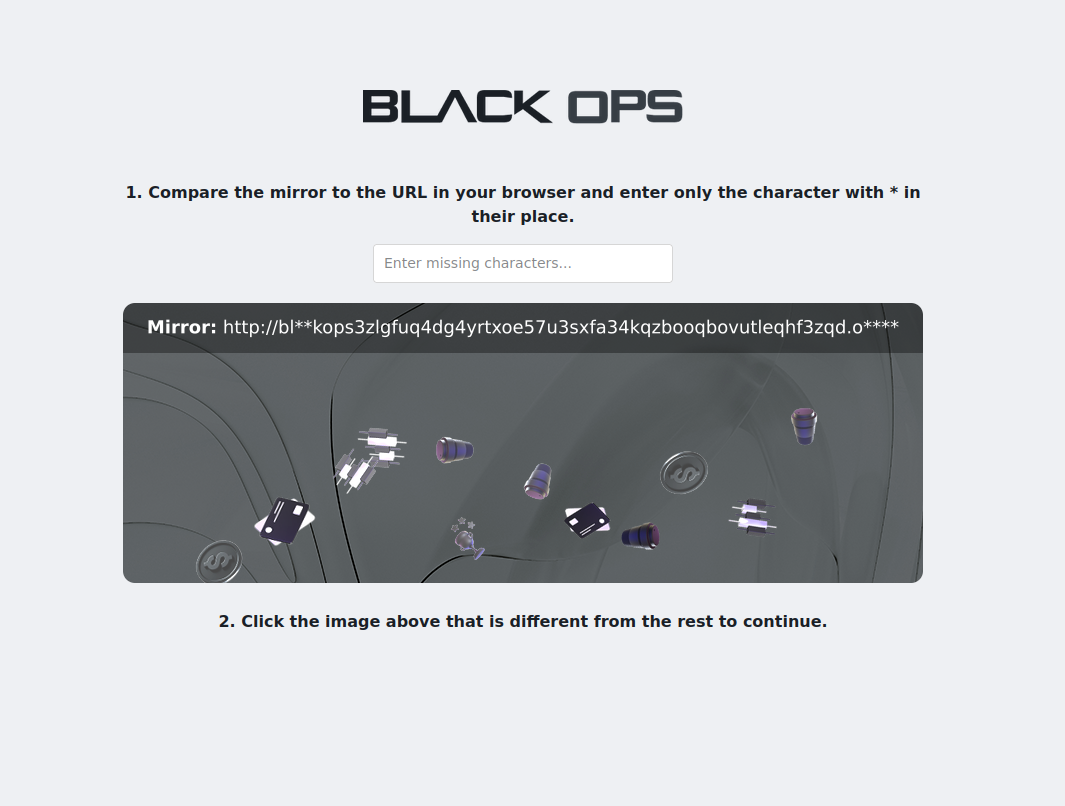
Select the image that's different from others. This verifies you're human and helps confirm you're on the real site.
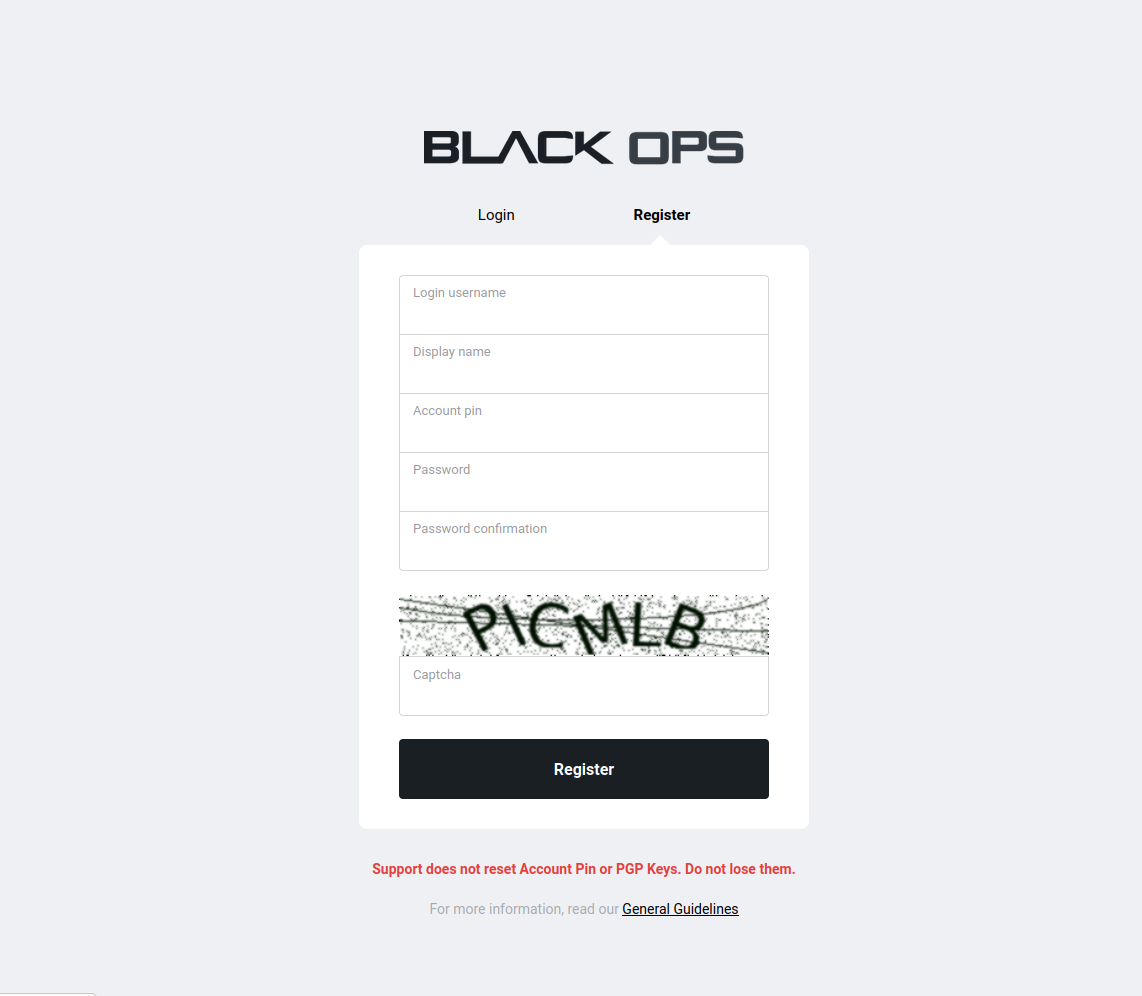
Enter username, display name, password, and PIN. Use unique values not used elsewhere.
Add your public key and decrypt the verification message to prove ownership.
Use KeePassXC or similar offline password manager. Never store in plain text or cloud services.
BlackOps Market accepts Monero (XMR) exclusively. All BlackOps Market purchases require Monero because it provides transaction privacy that Bitcoin cannot match. Setting up Monero properly for BlackOps Market protects your financial privacy.
Bitcoin transactions are visible on a public blockchain. Analysis firms track addresses, connect identities, and report to authorities. Monero hides:
| Method | Pros | Cons |
|---|---|---|
| Centralized Exchange (Kraken, Binance) | Easy, high liquidity | KYC required, linked to identity |
| Decentralized Exchange | No KYC usually | Lower liquidity, more complex |
| Swap Services | Convert BTC/ETH to XMR | Fees vary, some unreliable |
| P2P Trading | Can be anonymous | Scam risk, finding sellers |
Exchanges log withdrawal addresses. Using an intermediate personal wallet breaks the connection between your exchange account and platform activity.
With funds deposited to your BlackOps Market wallet, you can browse products and place orders protected by the BlackOps Market escrow system. Understanding the BlackOps Market ordering process helps ensure smooth transactions.
Before purchasing, research the vendor:
The 2-of-3 multisig escrow protects your funds:
Security isn't a one-time setup. Maintain good practices throughout your use of the platform.
Use "New Identity" in Tor between sessions. Clear browser data regularly. Don't leave sessions open unattended. Log out when finished.
Never reuse passwords. Update passwords periodically. Keep backups of PGP keys. Store credentials offline encrypted.
Verify mirrors before each use. Bookmark verified links. Never follow links from untrusted sources. Check PGP signatures on announcements.
Only deposit what you need. Withdraw unused funds. Use intermediate wallets for deposits. Monitor account for unauthorized activity.
After completing BlackOps Market registration and your first transaction, these practices will help you use the platform effectively.
Getting the most from BlackOps Market transactions requires attention to detail:
When contacting vendors or support on BlackOps Market:
Following these BlackOps Market best practices helps ensure a positive experience. The platform works best when all users maintain security standards.